Steganography : Hide Data in Images with Steghide
What Is Steganography?
Unlike encryption, where it's obvious that a message is being hidden, steganography hides data in plain view, inside a file like a picture. To anyone who isn't aware that it contains hidden data, it looks like just a normal, innocent picture. This is useful in situations where sending encrypted messages might raise suspicion, such as in countries where free speech is suppressed. It's also frequently used as a digital watermark to find when images or audio files are stolen. And on a less practical note — it's just cool.
How Is Steganography Implemented?
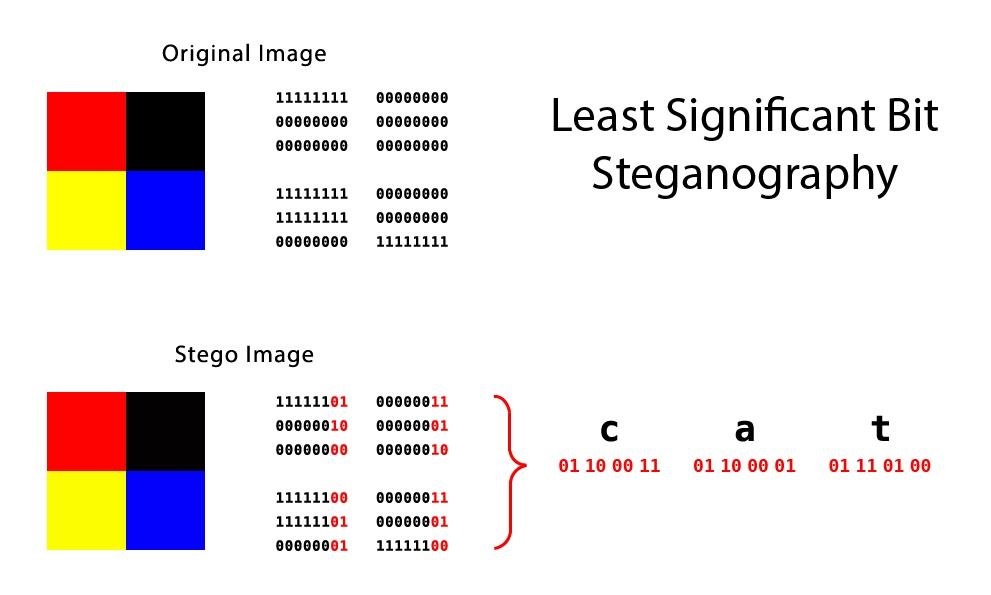
There are several different techniques for concealing data inside of normal files, one of the most widely used and perhaps simplest to understand is the least significant bit technique, or LSB. These techniques change the last few bits in a byte to encode a message. This is especially useful in something like an image, where the red, green, and blue values of each pixel are represented by eight bits (one byte), ranging from 0 to 255 in decimal, or 00000000 to 11111111 in binary.
Changing the last two bits in a completely red pixel from 11111111 to 11111101 only changes the red value from 255 to 253, which to the naked eye creates a nearly imperceptible change in color but still allows us to encode data inside of the picture.
The least significant bit technique works well for media files, where slightly changing byte values creates only slight imperceptible changes, but not so well for things like ASCII text, where a single bit out of place will completely change the character. That's not to mention the fact that data hidden using LSB steganography is also easy to detect if someone is looking for it.
For this reason, there are a plethora of other steganography techniques out there, each with their own benefits and drawbacks. Another far less detectable one is called the discrete cosine transform coefficient technique (I know, It's a mouthful) which slightly changes the weights (coefficients) of the cosine waves that are used to reconstruct a JPEG image.
Step 1How to Use Steganography Effectively
Keeping in mind that certain digital steganography techniques are better than others, generally, it's best to avoid the LSB technique and go for something a bit more sophisticated. In fact, designing your own steganography algorithm isn't terribly difficult if you already have good coding and math foundations.
Two other things to consider are encryption and compression. Encrypting data before embedding it adds an extra layer of security while compressing your data will obviously allow you to fit more into your cover file. Both encryption and compressions schemes can be included as optional parameters in Steghide, we'll cover these below.
Step 2Embedding Data with Steghide
Using Steghide is very easy, To install it from the terminal in linux just type the following.
apt-get install steghide
Once it's installed, in order to embed data in a file type the command below.
steghide embed -ef secretFile -cf coverFile -sf outputFile -z compressionLevel -e scheme
The arguments are broken down as follows:
- -ef specifies the path of the file that you want to hide. You can embed any kind of file inside of the cover file, including Python scripts or shell files.
- -cf is the file that the data is embedded into, this is restricted to BMP, JPEG, WAV to AU files.
- -sf is an optional argument that specifies the output file, if this is omitted, the original cover file will be overwritten by your new steganographic file.
- -z specifies the compression level, between 1 and 9. If you prefer not to compress your file use the argument -Z instead.
- Lastly, -e specifies the type of encryption. Steghide supports a multitude of encryption schemes, and if this argument is omitted by default, Steghide will use 128-bit AES encryption . If you prefer not use encryption, simply type -e none.

Once you have executed the Steghide command, you will be prompted to enter a password that will allow you to extract the embedded data later.

Step 3Extracting Hidden Data from a File
Extracting hidden data from a steganographic image is even easier. The command uses the syntax below.
$ steghide extract -sf stegoFile -xf outputFile
Once you run this command, you'll be prompted to enter the same password you created above in order to create the extracted file.
It's that simple!

Final Points
The advantage of steganography is that you can hide data in plain sight, but you can really blow it if you don't follow some common sense rules. First, the small differences steganography introduces are hard to detect — unless you have the original.
Using an image you found off the internet without modifying it significantly makes it easy to detect that an image has hidden information. To check this, try a reverse google image search to make sure the original isn't floating around somewhere.
I hope you enjoyed this tutorial and realized just how easy it is to use steganography. It literally only takes a moment to hide secret messages inside media files, and whether you're doing it for copyright protection or just to be cool, steganography has a multitude of applications.
Thanks for Reading.
🎁 Please Support (Donate Now) : https://paypal.me/sandeep4321/3
Google Plus Profile : https://plus.google.com/+TechnicalFoundation
Twitter Handle : https://twitter.com/technicalfunda
Facebook Page : https://www.facebook.com/technicalfoundation/
YouTube Channel : https://www.youtube.com/TechnicalFoundation
Hope U Liked this Post.
Please Like this Post and Share it .
Thanks for Visiting.
Comments
Post a Comment